准备内容
完成本章前,需要先完成以下内容:
开始
解释一下,字符驱动和总线设备驱动不同,没有匹配概念。
字符驱动程序
和上一篇文件相比,下面程序主要完善了ops操作结构体中的内容。file_operations结构体在include/linux/fs.h文件中有定义。
cdevfull_demo.c:
1
2
3
4
5
6
7
8
9
10
11
12
13
14
15
16
17
18
19
20
21
22
23
24
25
26
27
28
29
30
31
32
33
34
35
36
37
38
39
40
41
42
43
44
45
46
47
48
49
50
51
52
53
54
55
56
57
58
59
60
61
62
63
64
65
66
67
68
69
70
71
72
73
74
75
76
77
78
79
80
81
82
83
84
85
86
87
88
89
90
91
92
93
94
95
96
97
98
99
100
101
102
103
104
105
106
107
108
109
#include <linux/init.h>
#include <linux/module.h>
#include <linux/stat.h>
#include <linux/moduleparam.h>

#include <linux/fs.h>
#include <linux/cdev.h>
#include <linux/kdev_t.h>
#include <linux/device.h>
#include <linux/slab.h> //kzalloc

MODULE_LICENSE("Dual BSD/GPL");
MODULE_AUTHOR("Jerry");

static dev_t dev; //设备号
static int dev_major; //主设备号
static int dev_minor; //从设备号
#define DEVICE_NAME "dev_demo"
#define DEVICE_NUM 3  //连续分配的设备个数(优先递增从设备号)
#define DEVICE_CLASS_NUM 2 //设备种类数量
#define CLASS_NAME "class_demo"
#define NODE_NAME "node_demo"

module_param(dev_major,int,S_IRUSR);
module_param(dev_minor,int,S_IRUSR);

static int my_fops_open(struct inode *inode, struct file *file){
	printk(KERN_EMERG "fops is open!\n");
	return 0;
}
static int my_fops1_open(struct inode *inode, struct file *file){
	printk(KERN_EMERG "fops1 is open!\n");
	return 0;
}

static struct file_operations my_fops = {
	.owner = THIS_MODULE,
	.open = my_fops_open,
	//其他函数可在linux/fs.h中找到添加进去
};

static struct file_operations my_fops1 = {
	.owner = THIS_MODULE,
	.open = my_fops1_open,
};

static struct cdev *my_cdev; //建议静态全局
static struct class *my_class; //设备节点类

static int demo_init(void){
	int ret;

	dev = MKDEV(dev_major,dev_minor);
	if(dev_major == 0){ // 自动分配
		ret = alloc_chrdev_region(&dev,dev_minor,DEVICE_NUM,DEVICE_NAME);
	}
	else{
		ret = register_chrdev_region(dev,DEVICE_NUM,DEVICE_NAME);
	}

	if(ret < 0)
		goto fail;

	printk(KERN_EMERG "dev_major is : %d!\n",MAJOR(dev));
	printk(KERN_EMERG "dev_minor is : %d!\n",MINOR(dev));

	my_cdev = kzalloc(DEVICE_CLASS_NUM*sizeof(struct cdev),GFP_KERNEL);//申请内核内存并清空
	if(!my_cdev)
		goto fail;

	cdev_init(&my_cdev[0], &my_fops); //关联第一类设备和ops
	my_cdev[0].owner = THIS_MODULE;
	cdev_add(&my_cdev[0],dev,2); //在第一类设备下添加设备号为dev、dev+1的两个设备

	cdev_init(&my_cdev[1], &my_fops1); //关联第二类设备和ops
	my_cdev[1].owner = THIS_MODULE;
	cdev_add(&my_cdev[1],dev+2,1); //在第二类设备下添加设备号为dev+2的设备

	//生成设备类、设备节点
	my_class = class_create(THIS_MODULE,CLASS_NAME);
	device_create(my_class,NULL,dev,NULL,NODE_NAME);
	device_create(my_class,NULL,dev+1,NULL,NODE_NAME"%d",1);
	device_create(my_class,NULL,dev+2,NULL,NODE_NAME"%d",2);
	return 0;

fail:
	printk(KERN_EMERG "something is fail!\n");
	unregister_chrdev_region(dev,DEVICE_NUM); //失败就释放
	return 0;
}

static void demo_exit(void){
	int i=0;

	device_destroy(my_class,dev);
	device_destroy(my_class,dev+1);
	device_destroy(my_class,dev+2);
	class_destroy(my_class);

	//del cdev and free kmalloc/kzalloc
	for(i=0;i<DEVICE_CLASS_NUM;i++)
		cdev_del(&my_cdev[i]);

	unregister_chrdev_region(dev,DEVICE_NUM);
	return;
}

module_init(demo_init);
module_exit(demo_exit);
系统编程测试程序
test.c
1
2
3
4
5
6
7
8
9
10
11
12
13
14
15
16
17
18
19
20
21
22
#include <stdio.h>
#include <sys/types.h>
#include <sys/stat.h>
#include <fcntl.h>

int main(int argc,char *argv[]){
	char *node = "/dev/node_demo";
	char *node1 = "/dev/node_demo1";
	char *node2 = "/dev/node_demo2";
	int fd,fd1,fd2;

	fd = open(node,O_RDWR);
	fd1 = open(node1,O_RDWR);
	fd2 = open(node2,O_RDWR);
	if((fd < 0)||(fd1 < 0)||(fd2 < 0))
		goto fail;

	return 0;
fail:
	printf("Something is fail!\n");
	return 0;
}
验证结果
编写简单Makefile:参考这里
编译生成模块后,拷贝到开发板中:
-
直接加载模块,不传值(初值为0)

-
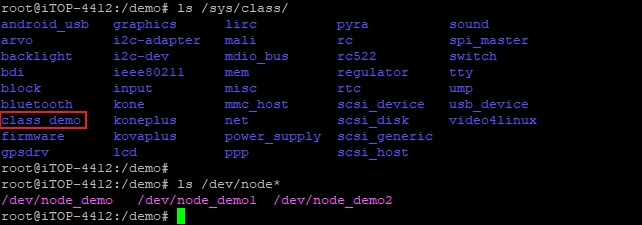
加载后可以看到已经生成了类节点和设备节点。
-
执行交叉编译的测试程序,结果如下,对应的关联信息均正确:
