获取GPIO编号的方式
获取编号-设置为输入方式
方法:获取GPIO编号,设置该GPIO为输入模式。
建立BUTTON节点
目标设备树文件:linux-4.14.2_iTop-4412_scp/arch/arm/boot/dts/exynos4412-itop-elite.dts
首先屏蔽文件中存在”&gpx1 1”的键值对。
然后在根节点/{…}内新增如下子节点,注意status属性为”okay”
1
2
3
4
5
itop_gpio_in {
    compatible = "gpio_in";
    status = "okay";
    gpioin = <&gpx1 1 0>;
};
上面的信息指GPX1[1]初始低电平。
重新编译设备树烧录到开发板。
编写驱动文件
button_demo_drv.c
1
2
3
4
5
6
7
8
9
10
11
12
13
14
15
16
17
18
19
20
21
22
23
24
25
26
27
28
29
30
31
32
33
34
35
36
37
38
39
40
41
42
43
44
45
46
47
48
49
50
51
52
53
54
55
56
57
58
59
60
61
62
63
64
65
66
67
68
69
70
71
72
73
#include <linux/init.h>
#include <linux/module.h>
#include <linux/platform_device.h>
#include <linux/of.h>
#include <linux/of_gpio.h>

MODULE_LICENSE("Dual BSD/GPL");
MODULE_AUTHOR("jerry");

#define DRV_NAME "gpio_in"

static int gpio_pin = 0;

static int demo_probe(struct platform_device *pdv){
	struct device_node *node = pdv->dev.of_node;
	int ret,value;

	printk("button probe ok!\n");

	gpio_pin = of_get_named_gpio(node, "gpioin", 0);
	if (gpio_pin < 0)
        printk("gpio_pin is not available \n");

	ret = gpio_request(gpio_pin, "gpio-in");
	if(ret!=0){
		printk("gpio_pin request %d faigpio.", gpio_pin);
		return ret;
	}
	printk("gpio_pin is %d\n",gpio_pin);
	gpio_free(gpio_pin);

	gpio_direction_input(gpio_pin);
	value = gpio_get_value(gpio_pin);
	printk("the value is %d\n",value);

	return 0;
}

static int demo_remove(struct platform_device *pdv){
	printk(KERN_EMERG "%s ok!\n",__FUNCTION__);
	return 0;
}

static const struct of_device_id of_demo_dt_match[] = {
	{.compatible = DRV_NAME},
	{},
};

MODULE_DEVICE_TABLE(of,of_demo_dt_match);

static struct platform_driver platform_drv_demo = {
	.driver	= {
		.name	= DRV_NAME,
		.owner	= THIS_MODULE,
		.of_match_table = of_demo_dt_match,
	},
	.probe	= demo_probe,
	.remove	= demo_remove,
};

static int __init demo_init(void){
	printk(KERN_EMERG "%s ok!\n",__FUNCTION__);
	platform_driver_register(&platform_drv_demo);
	return 0;
}
static void __exit demo_exit(void){
	printk(KERN_EMERG "%s ok!\n",__FUNCTION__);
	platform_driver_unregister(&platform_drv_demo);
	return;
}

module_init(demo_init);
module_exit(demo_exit);
Makefile:
1
2
3
4
5
6
7
8
9
10
11
12
13
14
15
#!/bin/bash

export ARCH=arm

obj-m += button_demo_drv.o

KDIR := /home/jerry/Projects/itop4412_kernel_4_14_2_bsp/linux-4.14.2_iTop-4412_scp/

PWD ?= $(shell pwd)

all:
	make -C $(KDIR) M=$(PWD) modules

clean:
	rm -rf *.o
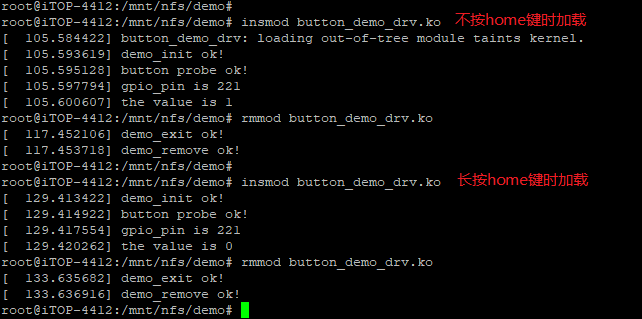
交叉编译然后加载到内核后发现probe可以正常执行,打印当前按键的键值。
此外还可以用pinctrl直接设置输入模式,获取节点属性进行设置。
获取编号-设置为中断方式
方法:获取GPIO编号,转irq编号,根据irq编号申请中断。
建立BUTTON节点
目标设备树文件:linux-4.14.2_iTop-4412_scp/arch/arm/boot/dts/exynos4412-itop-elite.dts
首先屏蔽文件中存在”&gpx1 1”的键值对。
然后在根节点/{…}内新增如下子节点,注意status属性为”okay”
1
2
3
4
5
itop_inter {
    compatible = "itop4412,inter_pin";
    status = "okay";
    inter_gpio = <&gpx1 1 0>;
};
上面的信息指GPX1[1]初始低电平。
重新编译设备树烧录到开发板。
编写驱动文件
button_demo_drv.c
1
2
3
4
5
6
7
8
9
10
11
12
13
14
15
16
17
18
19
20
21
22
23
24
25
26
27
28
29
30
31
32
33
34
35
36
37
38
39
40
41
42
43
44
45
46
47
48
49
50
51
52
53
54
55
56
57
58
59
60
61
62
63
64
65
66
67
68
69
70
71
72
73
74
75
76
77
78
79
80
81
82
83
84
85
86
87
88
#include <linux/init.h>
#include <linux/module.h>
#include <linux/platform_device.h>
#include <linux/of.h>
#include <linux/of_gpio.h>
#include <linux/irq.h>
#include <linux/interrupt.h>

MODULE_LICENSE("Dual BSD/GPL");
MODULE_AUTHOR("jerry");

#define DRV_NAME "itop4412,inter_pin"

static int inter_pin = 0;
static int irq = 0;

static irqreturn_t eint_interrupt(int irq, void *dev_id) {

	printk("%s(%d)\n", __FUNCTION__, __LINE__);
	printk("HOME KEY HIGH TO LOW!\n");

	return IRQ_HANDLED;
}

static int demo_probe(struct platform_device *pdv){
	struct device_node *node = pdv->dev.of_node;
	int ret;

	printk("button probe ok!\n");

	inter_pin = of_get_named_gpio(node, "inter_gpio", 0);
	if (inter_pin < 0)
        printk("inter_pin is not available \n");

	ret = gpio_request(inter_pin, "home-key-inter");
	if (ret) {
		printk("%s: request GPIO %d failed, ret = %d\n", DRV_NAME,inter_pin, ret);
		return ret;
	}
	gpio_direction_input(inter_pin);
	gpio_free(inter_pin);

	irq = gpio_to_irq(inter_pin);
	ret = request_irq(irq, eint_interrupt,IRQ_TYPE_EDGE_FALLING, "home-key-inter", pdv);
	if (ret < 0) {
		printk("Request IRQ %d failed, %d\n", irq,ret);
		return -1;
	}

	return 0;
}

static int demo_remove(struct platform_device *pdv){
	free_irq(irq,pdv); /*释放中断资源*/
	printk(KERN_EMERG "%s ok!\n",__FUNCTION__);
	return 0;
}

static const struct of_device_id of_demo_dt_match[] = {
	{.compatible = DRV_NAME},
	{},
};

MODULE_DEVICE_TABLE(of,of_demo_dt_match);

static struct platform_driver platform_drv_demo = {
	.driver	= {
		.name	= DRV_NAME,
		.owner	= THIS_MODULE,
		.of_match_table = of_demo_dt_match,
	},
	.probe	= demo_probe,
	.remove	= demo_remove,
};

static int __init demo_init(void){
	printk(KERN_EMERG "%s ok!\n",__FUNCTION__);
	platform_driver_register(&platform_drv_demo);
	return 0;
}
static void __exit demo_exit(void){
	printk(KERN_EMERG "%s ok!\n",__FUNCTION__);
	platform_driver_unregister(&platform_drv_demo);
	return;
}

module_init(demo_init);
module_exit(demo_exit);
Makefile:
1
2
3
4
5
6
7
8
9
10
11
12
13
14
15
#!/bin/bash

export ARCH=arm

obj-m += button_demo_drv.o

KDIR := /home/jerry/Projects/itop4412_kernel_4_14_2_bsp/linux-4.14.2_iTop-4412_scp/

PWD ?= $(shell pwd)

all:
	make -C $(KDIR) M=$(PWD) modules

clean:
	rm -rf *.o
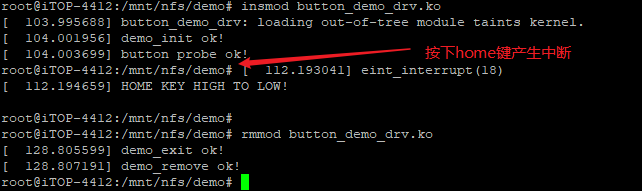
交叉编译然后加载到内核后发现probe可以正常执行,每次按下home键产生一个中断。
设备树中断属性获取中断号方式
方法:获取irq编号,根据irq编号申请中断(这里就不申请了)。
设备树文件修改
目标设备树文件:linux-4.14.2_iTop-4412_scp/arch/arm/boot/dts/exynos4412-itop-elite.dts
首先屏蔽文件中存在”&gpx1 1”、”&gpx1 2”的键值对。
然后在根节点/{…}内新增如下子节点,注意status属性为”okay”
1
2
3
4
5
6
itop-4412-gpio-keys {
    compatible = "itop-4412,gpio-keys";
    status = "okay";
    interrupt-parent = <&gpx1>;
    interrupts = <1 0>, <2 0>;
};
上面的信息指GPX1[1]、GPX1[2]设为中断。
重新编译设备树烧录到开发板。
编写驱动文件
button_demo_drv.c
1
2
3
4
5
6
7
8
9
10
11
12
13
14
15
16
17
18
19
20
21
22
23
24
25
26
27
28
29
30
31
32
33
34
35
36
37
38
39
40
41
42
43
44
45
46
47
48
49
50
51
52
53
54
55
56
57
58
59
60
61
#include <linux/init.h>
#include <linux/module.h>
#include <linux/platform_device.h>
#include <linux/of.h>
#include <linux/of_irq.h>

MODULE_LICENSE("Dual BSD/GPL");
MODULE_AUTHOR("jerry");

#define DRV_NAME "itop-4412,gpio-keys"

static int demo_probe(struct platform_device *pdv){
	struct device_node *node = pdv->dev.of_node;
	int irq[2];

	printk("button probe ok!\n");

	irq[0] = irq_of_parse_and_map(node,0);
	printk("irq number is %d\n",irq[0]);

	irq[1] = irq_of_parse_and_map(node,1);
	printk("irq number is %d\n",irq[1]);

	return 0;
}

static int demo_remove(struct platform_device *pdv){
	printk(KERN_EMERG "%s ok!\n",__FUNCTION__);
	return 0;
}

static const struct of_device_id of_demo_dt_match[] = {
	{.compatible = DRV_NAME},
	{},
};

MODULE_DEVICE_TABLE(of,of_demo_dt_match);

static struct platform_driver platform_drv_demo = {
	.driver	= {
		.name	= DRV_NAME,
		.owner	= THIS_MODULE,
		.of_match_table = of_demo_dt_match,
	},
	.probe	= demo_probe,
	.remove	= demo_remove,
};

static int __init demo_init(void){
	printk(KERN_EMERG "%s ok!\n",__FUNCTION__);
	platform_driver_register(&platform_drv_demo);
	return 0;
}
static void __exit demo_exit(void){
	printk(KERN_EMERG "%s ok!\n",__FUNCTION__);
	platform_driver_unregister(&platform_drv_demo);
	return;
}

module_init(demo_init);
module_exit(demo_exit);
Makefile:
1
2
3
4
5
6
7
8
9
10
11
12
13
14
15
#!/bin/bash

export ARCH=arm

obj-m += button_demo_drv.o

KDIR := /home/jerry/Projects/itop4412_kernel_4_14_2_bsp/linux-4.14.2_iTop-4412_scp/

PWD ?= $(shell pwd)

all:
	make -C $(KDIR) M=$(PWD) modules

clean:
	rm -rf *.o
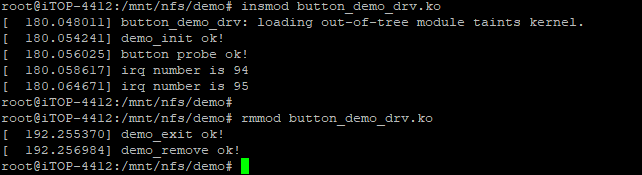
交叉编译然后加载到内核后发现probe可以正常执行,打印两个中断号。